Choose the base image, position interactive points and associate titles, text, images and videos with exploration content.
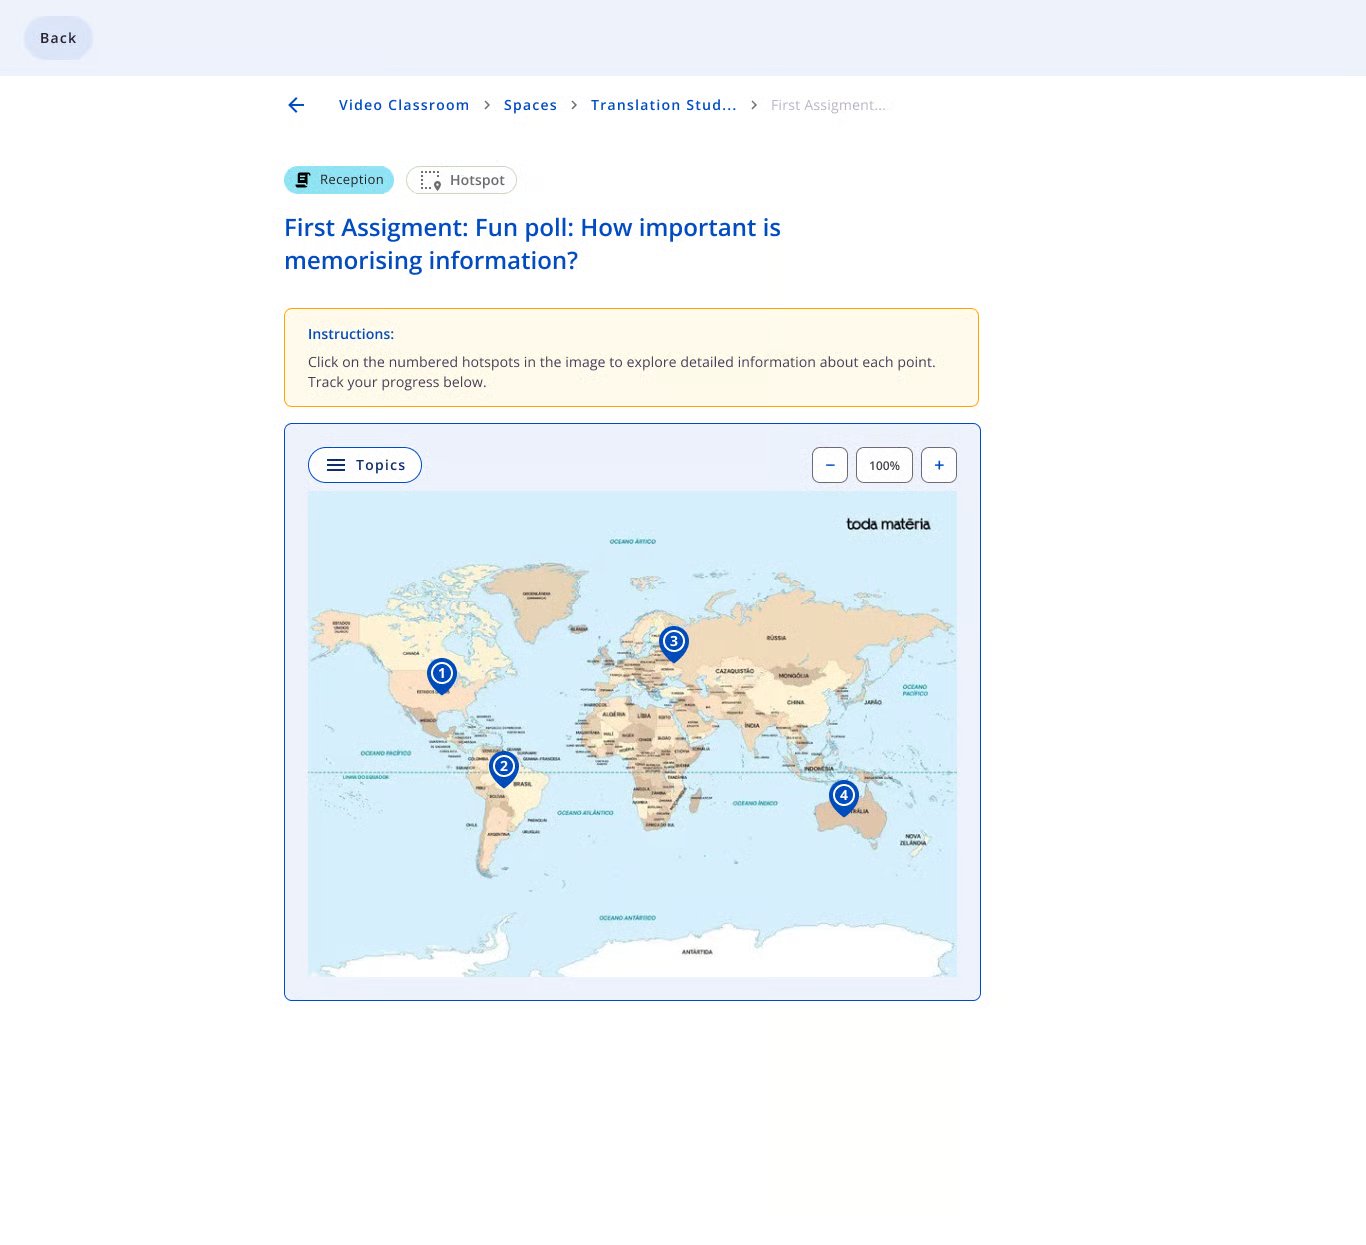
For SupervisorsIn Hot Spot activities (Hotspot in the interface), you turn an image into a surface for exploration. Selecting a numbered point gives participants access to information associated with that position, such as a title, text, image or sign language video.Use this format to explore maps, scenes, diagrams or parts of an object. Plan each point around information relevant to the learning objective.
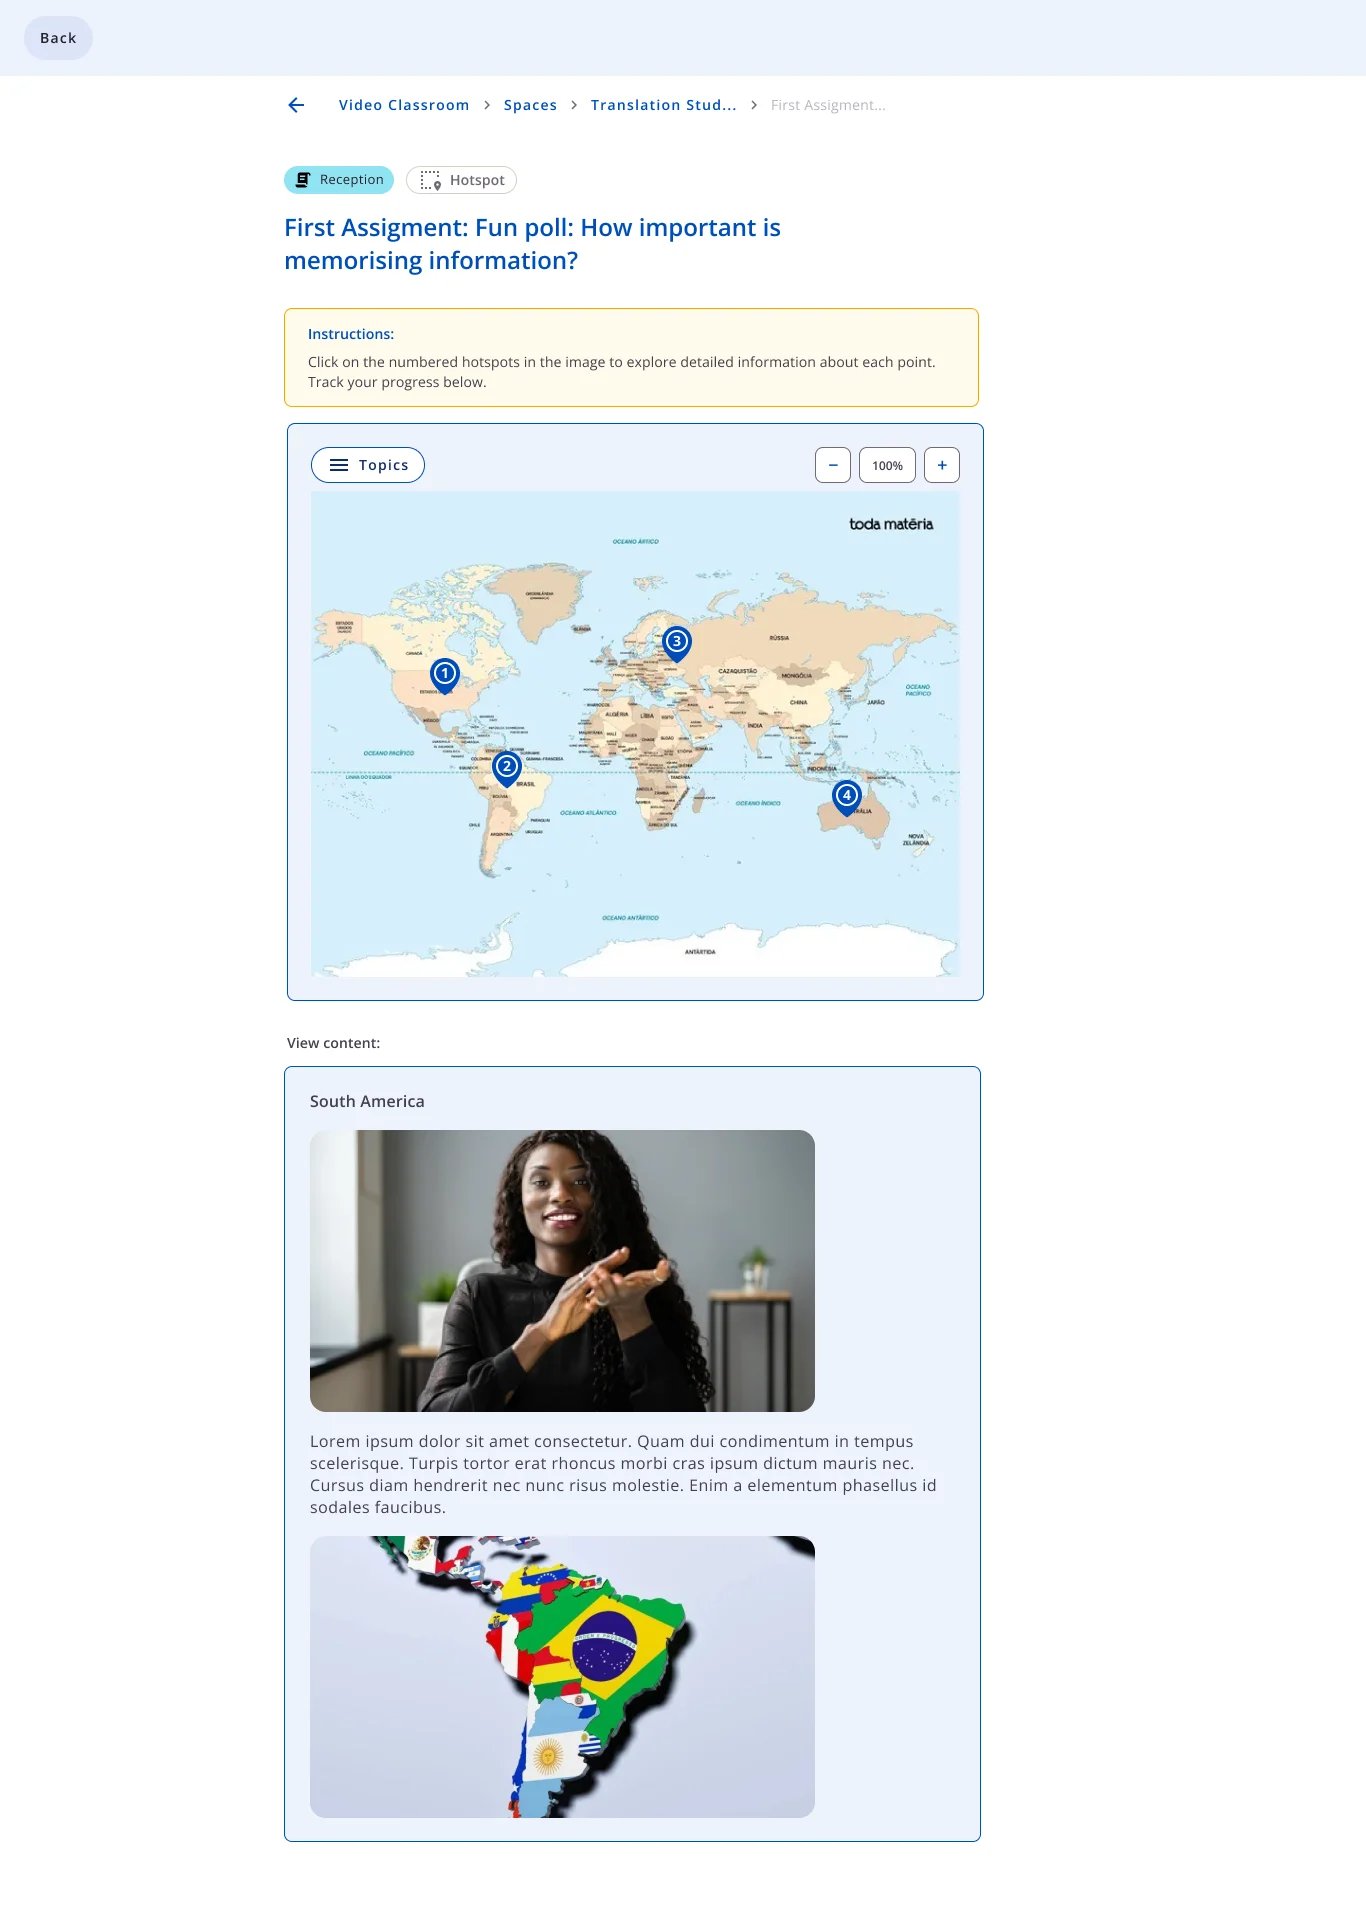
Participant view: image with numbered points and exploration controls.
The examples identify Reception as the activity type and Hotspot as the format. The screens show content exploration by clicking points; they do not show correct-answer or scoring fields. The screenshots are in English; the controls are explained throughout this page.
Plan the image and content
Choose an image in which the areas of interest are clearly identifiable. For each point, define what will be presented and how it relates to its position on the image.
Element
Purpose
Teaching example
Base image
Visually organises the exploration points.
A world map.
Hot Spot position
Associates content with an area of the image.
A point over South America.
Title
Identifies the point’s subject.
“South America”.
Content
Presents the information to explore.
An explanation about the region.
Media
Supplements the title or content.
A sign language video and a related image.
Prepare instructions such as “Explore the map points and consult the text and video information about each region.”
Create the activity
Choose Hot Spot and prepare the base image
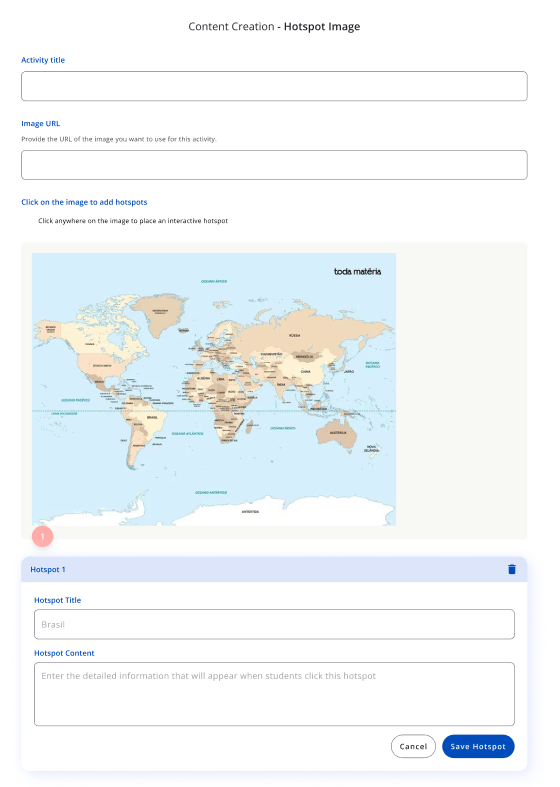
Enter the Space, open Assessment Activities and start creating a Reception activity, choosing Hot Spot.Check the Space and selected format. In Content Creation - Hotspot Image, complete Activity title.In the illustrated version, Image URL receives the base image address. Paste the address and check that the image appears in the workspace.
Creation: activity title, image URL and first point.
Choose a clear image and check its framing before positioning points. The base image differs from the media added to each Hot Spot’s content.
Click the image to add points
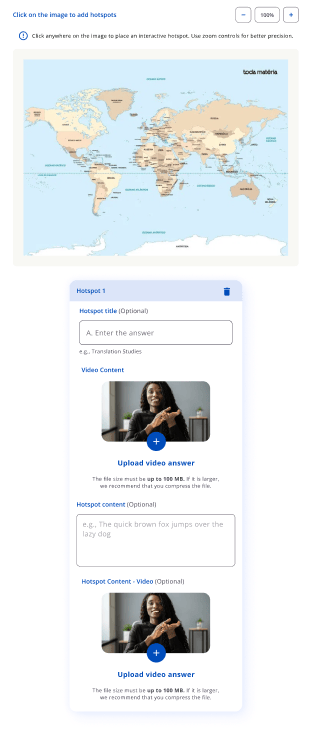
In Click on the image to add hotspots, click the position you want to associate with information.The interface identifies the point and displays its editing card, such as Hotspot 1.Use the zoom controls, when available, to position the marker more precisely. Avoid overlapping points or points so close together that they are hard to select.
Positioning: image with zoom and Hot Spot card.
On a map, the position should match the region explained. On a diagram or object, mark the part to which the content refers.
Enter the point title and explanation
In Hotspot Title or Hotspot title, enter a name that makes the subject recognisable.In Hotspot Content, prepare the information participants will see when they select the point.Keep the explanation related to the marked position. If the aim is to explore a region, present information about that region; if it is to identify part of an object, explain its function.Some versions mark title and content as optional. Check your installation’s fields and ensure that each point offers an understandable presentation, using resources appropriate for your audience.
Add media by URL when this form is displayed
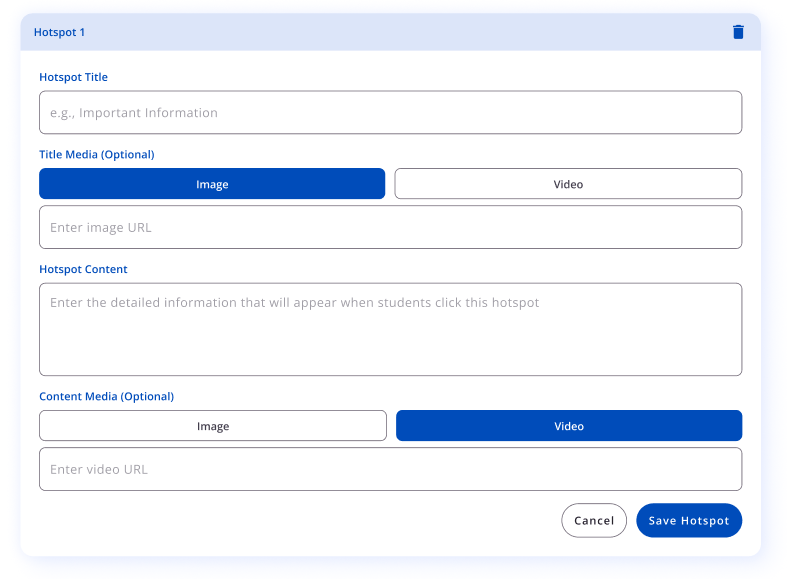
The URL version provides two optional areas:
Area
What to configure
Title Media
An image or video associated with the title presentation.
Content Media
An image or video supplementing the point’s explanation.
Select Image or Video in the desired area and complete the corresponding URL field.
Media by URL: title, content and image or video selection.
Check that each address loads the expected media. Selecting Video in one area does not mean that the other area has also received a video.You can use a sign language presentation alongside the title and another resource to develop the content, according to the available fields.
Upload videos when file fields are available
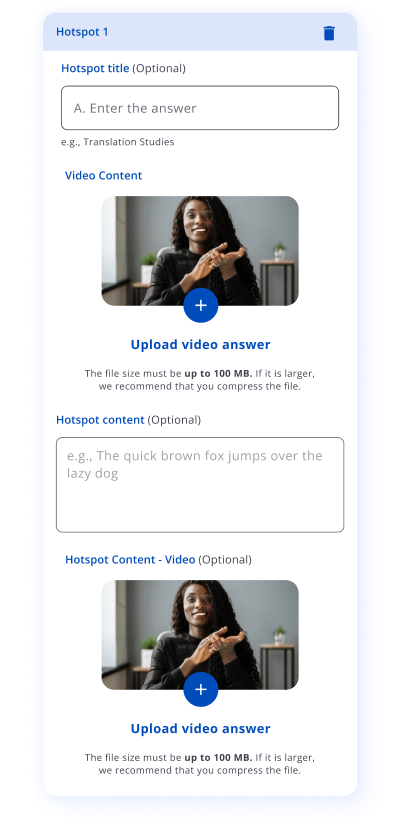
Another form version provides video fields with thumbnails and a + button instead of URL fields.The example shows Video Content and Hotspot Content - Video areas alongside title and text fields.
Media by file: point title, text and video fields.
Use the corresponding field control and check the preview after adding the file. The example indicates 100 MB; always check the limit shown in your installation.Prepare videos in the appropriate sign language for your audience and check that each one matches its field’s purpose.The screens show form variations. Follow the controls available in your installation to add media.
Save the point and check the full set
In the URL form, use Save Hotspot to confirm the point. In versions with other controls, finish editing according to the displayed interface.Repeat for other locations of interest. Check the relationship between each position, its title and associated content.The cards include a deletion control. After removing a point, review those remaining. If you change the base image, check all Hot Spot positions again.Saving a Hot Spot is one step in creation. Before finishing the activity, check all markers, text and media, then complete setup using the controls in your installation.
Check how content is presented
The supplied screens show two ways of displaying a point’s content. Check which is used in your installation and review the participant experience.
Content in a window over the image
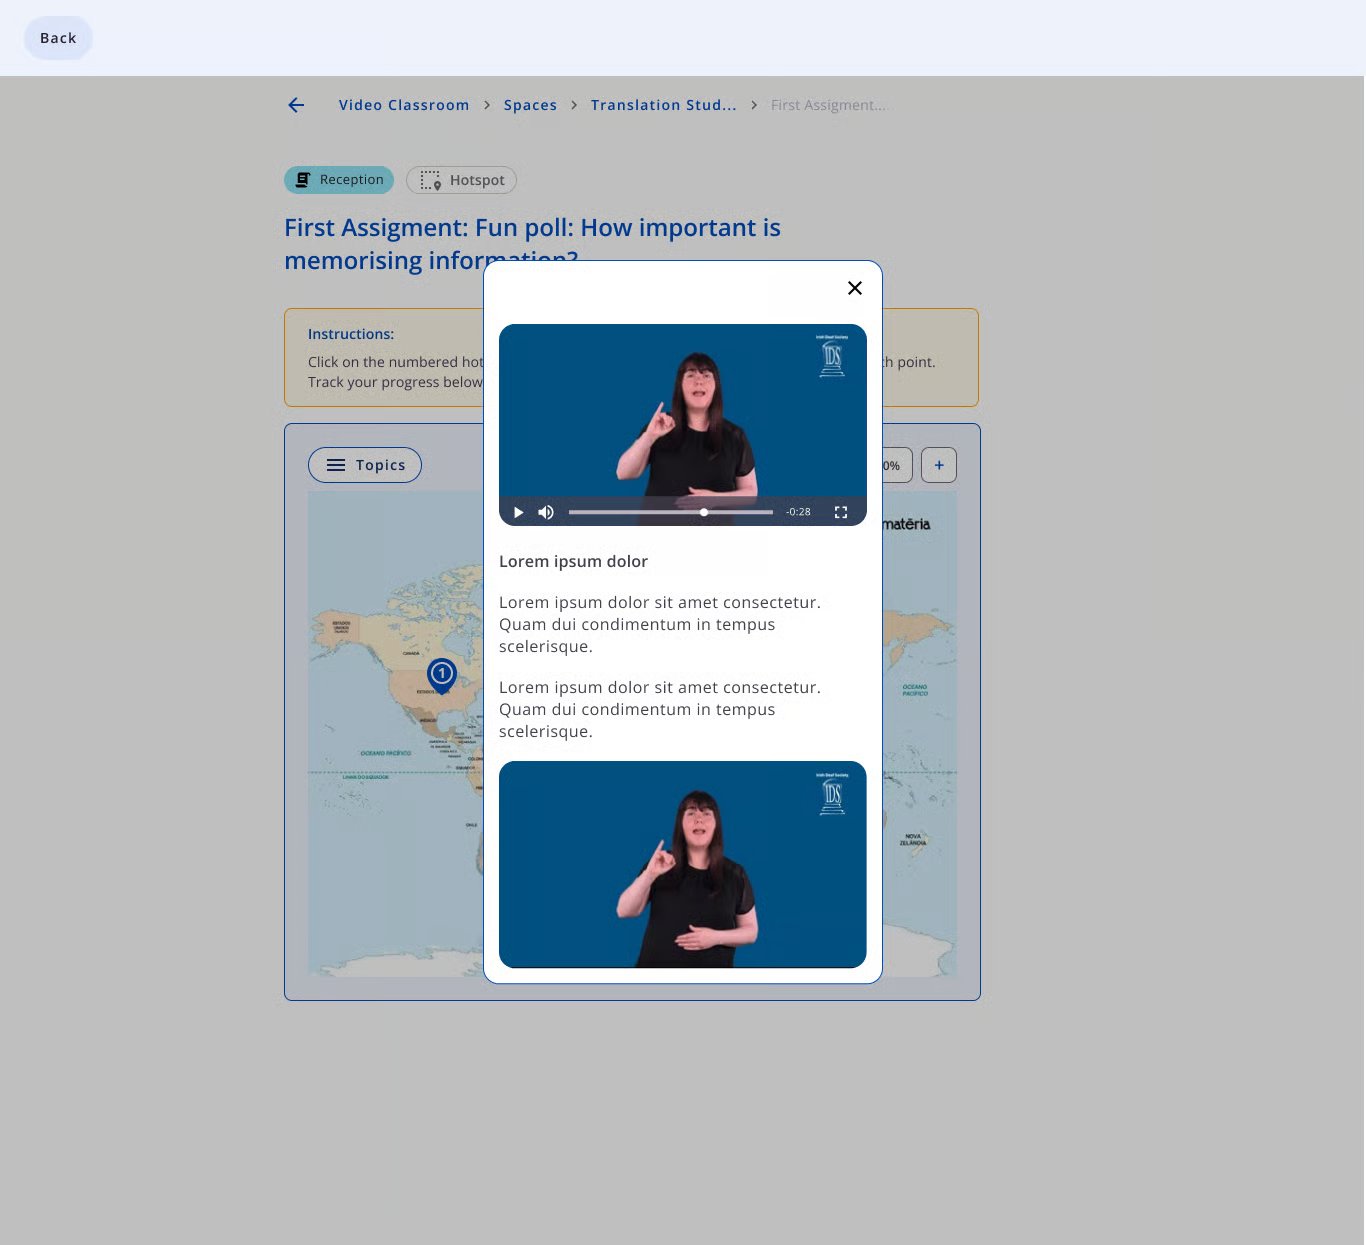
Selecting a point can display content in an overlay window, with media and text. X closes the window and returns to the image.
Exploration: point content in an overlay window.
Check that the title is recognisable, text is readable and videos play. Replace the Lorem ipsum example text with the activity information.
Content below the image
Another screen shows View content below the map. The example presents South America, sign language media, text and a related image.
Exploration: selected content displayed below the base image.
Participants select numbered points to explore information. Also check Topics and the zoom controls according to their availability in the interface.The screenshots do not demonstrate grading or automatic-completion rules based on click counts. When guiding the class, describe what to explore and check how activity monitoring is presented in your installation.
Review before finishing
Before making the activity available:
Check the Space, type, title and instructions.
Check that the base image loads correctly.
Check the position and selection of each point.
Review titles and explanations.
Test URLs and media added.
Play videos and check the sign language used.
Check readability and the relationship between image, text and video.
Open points in the participant presentation and check the content shown.
Review the full set after deleting points or replacing the base image.
Complete activity setup using the available controls and check the presentation of the full set.
Consult the activity overview
Relate the activity format to the learning objective and participation options.
Support VisuoLab’s continued development
The continuity of Levante Lab’s technical team is at risk without sustained funding.Support helps maintain VisuoLab and SignBank, improve accessibility, and sustain development and user assistance in collaboration with research partners and Deaf communities.Explore funding needs and ways to contribute →
Continue browsing
Previous
Create interactive video activities
Next
Configure assessment scales
{"docsConfig":{"theme":"mint","$schema":"https://mintlify.com/docs.json","name":"VisuoLab Docs","description":"Documentation and teaching guides for institutional VisuoLab partners.","colors":{"primary":"#004CBA","light":"#FFC61A","dark":"#112B6A"},"logo":{"light":"https://mintcdn.com/levante-lab/sHq77Ab4_9RhsSFq/images/logo-geral-horizontal-azul.png?fit=max\u0026auto=format\u0026n=sHq77Ab4_9RhsSFq\u0026q=85\u0026s=ad4fa21f31ba75ed8e2d17d1b2fbe57d","dark":"https://mintcdn.com/levante-lab/sHq77Ab4_9RhsSFq/images/logo-geral-horizontal-azul.png?fit=max\u0026auto=format\u0026n=sHq77Ab4_9RhsSFq\u0026q=85\u0026s=ad4fa21f31ba75ed8e2d17d1b2fbe57d"},"favicon":"https://visuolab.levantelab.com.br/_nuxt/img/logo-azul-mobile.0de2042.png","appearance":{"default":"light","strict":true},"background":{"decoration":"windows"},"navbar":{"links":[{"href":"mailto:contato@levantelab.com.br","label":"Support"}],"primary":{"type":"button","label":"About","href":"https://visuolab.levantelab.com.br/pt/landing-page/visuolab"}},"footer":{"socials":{"linkedin":"https://www.linkedin.com/company/levantelab/posts?feedView=all","instagram":"https://instagram.com/levantelab","website":"https://levantelab.com.br"}},"fonts":{"family":"Open Sans"},"icons":{"library":"fontawesome"},"contextual":{"options":["copy","view","chatgpt","claude","perplexity","mcp","cursor","vscode"],"display":"header"},"styling":{"latex":true},"navigation":{"pages":[]}},"deployment":{"deploymentMetadataValue":{"subdomain":"levante-lab","hasAudioNarration":false,"actualSubdomain":"levante-lab","customDomains":["docs-visuolab.levantelab.com.br"],"gitSource":{"type":"github","owner":"mintlify-community","repo":"docs-levante-lab-31fdfb04","deployBranch":"main","contentDirectory":"","isPrivate":true,"mountPath":"","label":""},"feedback":{"thumbs":true},"entitlements":{"AI_CHAT":{"status":"DISABLED"},"WEB_MCP":{"status":"DISABLED"},"NARRATION":{"status":"DISABLED"}},"buildId":"6af71360d091d1e5497703a9","clientVersion":"0.0.4143","searchFilterCounts":[{"language":"default","tag":"Deutsch","count":56},{"language":"default","tag":"English","count":56},{"language":"default","tag":"Eesti","count":56},{"language":"default","tag":"Magyar","count":56},{"language":"default","tag":"Português","count":56},{"language":"default","tag":"VisuoLab nutzen","count":33},{"language":"default","tag":"Use VisuoLab","count":33},{"language":"default","tag":"VisuoLabi kasutamine","count":33},{"language":"default","tag":"A VisuoLab használata","count":33},{"language":"default","tag":"Usar a VisuoLab","count":33}]},"assistantConfig":{"enableAskAiButton":false,"enableStarterQuestions":false,"enableContextualStarterQuestions":false,"enableAskAiSearchBar":true,"deflection":{"enabled":true,"email":"contato@levantelab.com.br"}},"basePath":"","hasChatPermissions":false,"hasWebMcpPermissions":false,"toggles":[{"name":"kill-isr","enabled":true,"variant":{"name":"disabled","enabled":false,"feature_enabled":true},"impressionData":false},{"name":"custom-rbac-roles","enabled":true,"variant":{"name":"disabled","enabled":false,"feature_enabled":true},"impressionData":false},{"name":"agent-mintlify-slack","enabled":true,"variant":{"name":"disabled","enabled":false,"feature_enabled":true},"impressionData":false},{"name":"agent-integrations-settings","enabled":true,"variant":{"name":"disabled","enabled":false,"feature_enabled":true},"impressionData":false},{"name":"rbac-expansion","enabled":true,"variant":{"name":"disabled","enabled":false,"feature_enabled":true},"impressionData":false},{"name":"automations-pr-grouping","enabled":true,"variant":{"name":"disabled","enabled":false,"feature_enabled":true},"impressionData":false},{"name":"custom-prefix","enabled":true,"variant":{"name":"disabled","enabled":false,"feature_enabled":true},"impressionData":false},{"name":"analytics-v7","enabled":true,"variant":{"name":"disabled","enabled":false,"feature_enabled":true},"impressionData":false},{"name":"user-flows-analytics","enabled":true,"variant":{"name":"disabled","enabled":false,"feature_enabled":true},"impressionData":false},{"name":"no-publish-flow","enabled":true,"variant":{"name":"disabled","enabled":false,"feature_enabled":true},"impressionData":false},{"name":"workos-onboarding","enabled":true,"variant":{"name":"disabled","enabled":false,"feature_enabled":true},"impressionData":false},{"name":"snapshot-serving-live","enabled":true,"variant":{"name":"disabled","enabled":false,"feature_enabled":true},"impressionData":false},{"name":"stripTemperatureMiddleware","enabled":true,"variant":{"name":"disabled","enabled":false,"feature_enabled":true},"impressionData":false},{"name":"support-platform-pylon-zendesk","enabled":true,"variant":{"name":"disabled","enabled":false,"feature_enabled":true},"impressionData":false},{"name":"snapshot-serving","enabled":true,"variant":{"name":"disabled","enabled":false,"feature_enabled":true},"impressionData":false},{"name":"instant-rollback","enabled":true,"variant":{"name":"disabled","enabled":false,"feature_enabled":true},"impressionData":false},{"name":"granular-notifications-server","enabled":true,"variant":{"name":"disabled","enabled":false,"feature_enabled":true},"impressionData":false},{"name":"granular-notifications","enabled":true,"variant":{"name":"disabled","enabled":false,"feature_enabled":true},"impressionData":false},{"name":"automations-fable","enabled":true,"variant":{"name":"disabled","enabled":false,"feature_enabled":true},"impressionData":false},{"name":"fixed-ai-action-pricing","enabled":true,"variant":{"name":"disabled","enabled":false,"feature_enabled":true},"impressionData":false},{"name":"automation-resolve-merge-conflict","enabled":true,"variant":{"name":"disabled","enabled":false,"feature_enabled":true},"impressionData":false},{"name":"scoped-publishing","enabled":true,"variant":{"name":"disabled","enabled":false,"feature_enabled":true},"impressionData":false},{"name":"mintql","enabled":true,"variant":{"name":"disabled","enabled":false,"feature_enabled":true},"impressionData":false},{"name":"page-level-analytics","enabled":true,"variant":{"name":"disabled","enabled":false,"feature_enabled":true},"impressionData":false},{"name":"editor-version-history-v2","enabled":true,"variant":{"name":"disabled","enabled":false,"feature_enabled":true},"impressionData":false},{"name":"billing-page-v2","enabled":true,"variant":{"name":"disabled","enabled":false,"feature_enabled":true},"impressionData":false},{"name":"full-page-search","enabled":true,"variant":{"name":"disabled","enabled":false,"feature_enabled":true},"impressionData":false},{"name":"workspace-projects","enabled":true,"variant":{"name":"disabled","enabled":false,"feature_enabled":true},"impressionData":false},{"name":"assistant-v5","enabled":true,"variant":{"name":"disabled","enabled":false,"feature_enabled":true},"impressionData":false},{"name":"fork-pr-previews","enabled":true,"variant":{"name":"disabled","enabled":false,"feature_enabled":true},"impressionData":false},{"name":"revalidation-jwt","enabled":true,"variant":{"name":"disabled","enabled":false,"feature_enabled":true},"impressionData":false},{"name":"workos-sso-scim","enabled":true,"variant":{"name":"disabled","enabled":false,"feature_enabled":true},"impressionData":false},{"name":"hobby-abuse-scan","enabled":true,"variant":{"name":"disabled","enabled":false,"feature_enabled":true},"impressionData":false},{"name":"dashboard-inbox","enabled":true,"variant":{"name":"disabled","enabled":false,"feature_enabled":true},"impressionData":false},{"name":"workos-signup","enabled":true,"variant":{"name":"disabled","enabled":false,"feature_enabled":true},"impressionData":false},{"name":"turbopuffer-dual-write","enabled":true,"variant":{"name":"disabled","enabled":false,"feature_enabled":true},"impressionData":false},{"name":"workos-enabled","enabled":true,"variant":{"name":"disabled","enabled":false,"feature_enabled":true},"impressionData":false},{"name":"approve-review-flow","enabled":true,"variant":{"name":"disabled","enabled":false,"feature_enabled":true},"impressionData":false},{"name":"editor-metadata","enabled":true,"variant":{"name":"disabled","enabled":false,"feature_enabled":true},"impressionData":false},{"name":"sso-setup-deadline-banner","enabled":true,"variant":{"name":"disabled","enabled":false,"feature_enabled":true},"impressionData":false},{"name":"turbopuffer-serve","enabled":true,"variant":{"name":"disabled","enabled":false,"feature_enabled":true},"impressionData":false},{"name":"live-agents","enabled":true,"variant":{"name":"disabled","enabled":false,"feature_enabled":true},"impressionData":false},{"name":"llms-txt-v2","enabled":true,"variant":{"name":"disabled","enabled":false,"feature_enabled":true},"impressionData":false}],"privacy":{"consentBanner":{"enabled":true}},"googleFontsInlined":true},"customCss":[],"page":{"pagePath":"en/visual-classroom/supervisor/assessment/hotspot","slug":"/en/visual-classroom/supervisor/assessment/hotspot","pageMetadata":{"title":"Create Hot Spot activities","sidebarTitle":"Hot Spot","description":"Choose the base image, position interactive points and associate titles, text, images and videos with exploration content.","icon":"location-dot","hideFooterPagination":true,"href":"/en/visual-classroom/supervisor/assessment/hotspot"},"description":{"compiledSource":"\"use strict\";\nconst {jsx: _jsx} = arguments[0];\nconst {useMDXComponents: _provideComponents} = arguments[0];\nfunction _createMdxContent(props) {\n const _components = {\n p: \"p\",\n ..._provideComponents(),\n ...props.components\n };\n return _jsx(_components.p, {\n children: \"Choose the base image, position interactive points and associate titles, text, images and videos with exploration content.\"\n });\n}\nfunction MDXContent(props = {}) {\n const {wrapper: MDXLayout} = {\n ..._provideComponents(),\n ...props.components\n };\n return MDXLayout ? _jsx(MDXLayout, {\n ...props,\n children: _jsx(_createMdxContent, {\n ...props\n })\n }) : _createMdxContent(props);\n}\nreturn {\n default: MDXContent\n};\n","frontmatter":{},"scope":{}},"pageType":"default","mdx":{"mdxSource":{"compiledSource":"\"use strict\";const{Fragment:_Fragment,jsx:_jsx,jsxs:_jsxs}=arguments[0];const{useMDXComponents:_provideComponents}=arguments[0];function _createMdxContent(props){const _components={a:`a`,li:`li`,p:`p`,strong:`strong`,tbody:`tbody`,td:`td`,th:`th`,thead:`thead`,tr:`tr`,ul:`ul`,..._provideComponents(),...props.components},{Card,CardGroup,Frame,Heading,Info,Note,OptimizedImage,Step,Steps,Table}=_components;if(!Card)_missingMdxReference(`Card`,true);if(!CardGroup)_missingMdxReference(`CardGroup`,true);if(!Frame)_missingMdxReference(`Frame`,true);if(!Heading)_missingMdxReference(`Heading`,true);if(!Info)_missingMdxReference(`Info`,true);if(!Note)_missingMdxReference(`Note`,true);if(!OptimizedImage)_missingMdxReference(`OptimizedImage`,true);if(!Step)_missingMdxReference(`Step`,true);if(!Steps)_missingMdxReference(`Steps`,true);if(!Table)_missingMdxReference(`Table`,true);return _jsxs(_Fragment,{children:[_jsx(_components.p,{children:_jsx(_components.strong,{children:`For Supervisors`})}),`\n`,_jsxs(_components.p,{children:[`In `,_jsx(_components.strong,{children:`Hot Spot`}),` activities (`,_jsx(_components.strong,{children:`Hotspot`}),` in the interface), you turn an image into a surface for exploration. Selecting a numbered point gives participants access to information associated with that position, such as a title, text, image or sign language video.`]}),`\n`,_jsx(OptimizedImage,{src:`https://mintcdn.com/levante-lab/iSV727FKjPVHmEYK/images/image-63.png?fit=max\u0026auto=format\u0026n=iSV727FKjPVHmEYK\u0026q=85\u0026s=f144a041d039ed91c9bf15e3dfedeff7`,alt:`Hot Spot activity example`,\"data-og-width\":`1366`,width:`1366`,\"data-og-height\":`1245`,height:`1245`,\"data-path\":`images/image-63.png`,\"data-optimize\":`true`,\"data-opv\":`3`,srcset:`https://mintcdn.com/levante-lab/iSV727FKjPVHmEYK/images/image-63.png?w=280\u0026fit=max\u0026auto=format\u0026n=iSV727FKjPVHmEYK\u0026q=85\u0026s=e395044d02456573759bd6e9e5c414f2 280w, https://mintcdn.com/levante-lab/iSV727FKjPVHmEYK/images/image-63.png?w=560\u0026fit=max\u0026auto=format\u0026n=iSV727FKjPVHmEYK\u0026q=85\u0026s=14fac4dffb7917b403dbf020b0a1072a 560w, https://mintcdn.com/levante-lab/iSV727FKjPVHmEYK/images/image-63.png?w=840\u0026fit=max\u0026auto=format\u0026n=iSV727FKjPVHmEYK\u0026q=85\u0026s=4283bc012574584ff7ea5e1f945d541b 840w, https://mintcdn.com/levante-lab/iSV727FKjPVHmEYK/images/image-63.png?w=1100\u0026fit=max\u0026auto=format\u0026n=iSV727FKjPVHmEYK\u0026q=85\u0026s=6fc1ad1349392f0caf6c535c0fb84689 1100w, https://mintcdn.com/levante-lab/iSV727FKjPVHmEYK/images/image-63.png?w=1650\u0026fit=max\u0026auto=format\u0026n=iSV727FKjPVHmEYK\u0026q=85\u0026s=b18e2372e0f926db1540bb6903a790d8 1650w, https://mintcdn.com/levante-lab/iSV727FKjPVHmEYK/images/image-63.png?w=2500\u0026fit=max\u0026auto=format\u0026n=iSV727FKjPVHmEYK\u0026q=85\u0026s=1dbdb6020520fe2c75d7d155f32d8d7b 2500w`}),`\n`,_jsx(_components.p,{children:`Use this format to explore maps, scenes, diagrams or parts of an object. Plan each point around information relevant to the learning objective.`}),`\n`,_jsx(OptimizedImage,{src:`https://mintcdn.com/levante-lab/iSV727FKjPVHmEYK/images/image-64.png?fit=max\u0026auto=format\u0026n=iSV727FKjPVHmEYK\u0026q=85\u0026s=21f3dd24e0278cc89f78ef8ba7c60485`,alt:`Hot Spot image exploration example`,\"data-og-width\":`1366`,width:`1366`,\"data-og-height\":`1245`,height:`1245`,\"data-path\":`images/image-64.png`,\"data-optimize\":`true`,\"data-opv\":`3`,srcset:`https://mintcdn.com/levante-lab/iSV727FKjPVHmEYK/images/image-64.png?w=280\u0026fit=max\u0026auto=format\u0026n=iSV727FKjPVHmEYK\u0026q=85\u0026s=4126e2ae318ccb9ee2da9d5b1f5c5090 280w, https://mintcdn.com/levante-lab/iSV727FKjPVHmEYK/images/image-64.png?w=560\u0026fit=max\u0026auto=format\u0026n=iSV727FKjPVHmEYK\u0026q=85\u0026s=e85400f257c919232522e5da63285694 560w, https://mintcdn.com/levante-lab/iSV727FKjPVHmEYK/images/image-64.png?w=840\u0026fit=max\u0026auto=format\u0026n=iSV727FKjPVHmEYK\u0026q=85\u0026s=31a5d85a8a16c60d788a21a6d031a570 840w, https://mintcdn.com/levante-lab/iSV727FKjPVHmEYK/images/image-64.png?w=1100\u0026fit=max\u0026auto=format\u0026n=iSV727FKjPVHmEYK\u0026q=85\u0026s=d7ccff646fa347d79fce3eb4b5938420 1100w, https://mintcdn.com/levante-lab/iSV727FKjPVHmEYK/images/image-64.png?w=1650\u0026fit=max\u0026auto=format\u0026n=iSV727FKjPVHmEYK\u0026q=85\u0026s=7c33770dbd03a0902c0084c24facb96f 1650w, https://mintcdn.com/levante-lab/iSV727FKjPVHmEYK/images/image-64.png?w=2500\u0026fit=max\u0026auto=format\u0026n=iSV727FKjPVHmEYK\u0026q=85\u0026s=e6e51131b9b13529f540ba7e92722d3d 2500w`}),`\n`,_jsx(Frame,{caption:`Participant view: image with numbered points and exploration controls.`,children:_jsx(`div`,{style:{position:`relative`,aspectRatio:`730 / 870`,width:`100%`,maxWidth:`760px`,margin:`0 auto`,overflow:`hidden`,borderRadius:`12px`},children:_jsx(OptimizedImage,{src:`https://mintcdn.com/levante-lab/iSV727FKjPVHmEYK/images/supervisor-hotspot/participant-map.png?fit=max\u0026auto=format\u0026n=iSV727FKjPVHmEYK\u0026q=85\u0026s=4614f928969c950c8e5ba993bfb4d23b`,alt:`Hotspot activity with instructions, world map, four numbered points, Topics and zoom controls.`,loading:`lazy`,style:{position:`absolute`,width:`187.12329%`,maxWidth:`none`,height:`auto`,left:`-36.98630%`,top:`-17.24138%`,margin:0},\"data-og-width\":`1366`,width:`1366`,\"data-og-height\":`1245`,height:`1245`,\"data-path\":`images/supervisor-hotspot/participant-map.png`,\"data-optimize\":`true`,\"data-opv\":`3`,srcset:`https://mintcdn.com/levante-lab/iSV727FKjPVHmEYK/images/supervisor-hotspot/participant-map.png?w=280\u0026fit=max\u0026auto=format\u0026n=iSV727FKjPVHmEYK\u0026q=85\u0026s=982ae782b0568c0994ae739fd28fb48c 280w, https://mintcdn.com/levante-lab/iSV727FKjPVHmEYK/images/supervisor-hotspot/participant-map.png?w=560\u0026fit=max\u0026auto=format\u0026n=iSV727FKjPVHmEYK\u0026q=85\u0026s=0f26af9ace00aebc12c12444d678912e 560w, https://mintcdn.com/levante-lab/iSV727FKjPVHmEYK/images/supervisor-hotspot/participant-map.png?w=840\u0026fit=max\u0026auto=format\u0026n=iSV727FKjPVHmEYK\u0026q=85\u0026s=f077e6ee452d95e4ee7969701eac525a 840w, https://mintcdn.com/levante-lab/iSV727FKjPVHmEYK/images/supervisor-hotspot/participant-map.png?w=1100\u0026fit=max\u0026auto=format\u0026n=iSV727FKjPVHmEYK\u0026q=85\u0026s=d5b2aebd133bebeac9b02b0df854ef1f 1100w, https://mintcdn.com/levante-lab/iSV727FKjPVHmEYK/images/supervisor-hotspot/participant-map.png?w=1650\u0026fit=max\u0026auto=format\u0026n=iSV727FKjPVHmEYK\u0026q=85\u0026s=c54ad7c9b6b214768c2ce4fe9c17fe84 1650w, https://mintcdn.com/levante-lab/iSV727FKjPVHmEYK/images/supervisor-hotspot/participant-map.png?w=2500\u0026fit=max\u0026auto=format\u0026n=iSV727FKjPVHmEYK\u0026q=85\u0026s=61cc267e44e12e243c5e76de285d9f87 2500w`})})}),`\n`,_jsx(Info,{children:_jsxs(_components.p,{children:[`The examples identify `,_jsx(_components.strong,{children:`Reception`}),` as the activity type and `,_jsx(_components.strong,{children:`Hotspot`}),` as the format. The screens show content exploration by clicking points; they do not show correct-answer or scoring fields. The screenshots are in English; the controls are explained throughout this page.`]})}),`\n`,_jsx(Heading,{level:`2`,id:`plan-the-image-and-content`,children:`Plan the image and content`}),`\n`,_jsx(_components.p,{children:`Choose an image in which the areas of interest are clearly identifiable. For each point, define what will be presented and how it relates to its position on the image.`}),`\n`,_jsxs(Table,{children:[_jsx(_components.thead,{children:_jsxs(_components.tr,{children:[_jsx(_components.th,{children:`Element`}),_jsx(_components.th,{children:`Purpose`}),_jsx(_components.th,{children:`Teaching example`})]})}),_jsxs(_components.tbody,{children:[_jsxs(_components.tr,{children:[_jsx(_components.td,{children:_jsx(_components.strong,{children:`Base image`})}),_jsx(_components.td,{children:`Visually organises the exploration points.`}),_jsx(_components.td,{children:`A world map.`})]}),_jsxs(_components.tr,{children:[_jsx(_components.td,{children:_jsx(_components.strong,{children:`Hot Spot position`})}),_jsx(_components.td,{children:`Associates content with an area of the image.`}),_jsx(_components.td,{children:`A point over South America.`})]}),_jsxs(_components.tr,{children:[_jsx(_components.td,{children:_jsx(_components.strong,{children:`Title`})}),_jsx(_components.td,{children:`Identifies the point’s subject.`}),_jsx(_components.td,{children:`“South America”.`})]}),_jsxs(_components.tr,{children:[_jsx(_components.td,{children:_jsx(_components.strong,{children:`Content`})}),_jsx(_components.td,{children:`Presents the information to explore.`}),_jsx(_components.td,{children:`An explanation about the region.`})]}),_jsxs(_components.tr,{children:[_jsx(_components.td,{children:_jsx(_components.strong,{children:`Media`})}),_jsx(_components.td,{children:`Supplements the title or content.`}),_jsx(_components.td,{children:`A sign language video and a related image.`})]})]})]}),`\n`,_jsxs(_components.p,{children:[`Prepare instructions such as `,_jsx(_components.strong,{children:`“Explore the map points and consult the text and video information about each region.”`})]}),`\n`,_jsx(Heading,{level:`2`,id:`create-the-activity`,children:`Create the activity`}),`\n`,_jsxs(Steps,{children:[_jsxs(Step,{title:`Choose Hot Spot and prepare the base image`,icon:`location-dot`,children:[_jsxs(_components.p,{children:[`Enter the `,_jsx(_components.strong,{children:`Space`}),`, open `,_jsx(_components.strong,{children:`Assessment Activities`}),` and start creating a `,_jsx(_components.strong,{children:`Reception`}),` activity, choosing `,_jsx(_components.strong,{children:`Hot Spot`}),`.`]}),_jsxs(_components.p,{children:[`Check the Space and selected format. In `,_jsx(_components.strong,{children:`Content Creation - Hotspot Image`}),`, complete `,_jsx(_components.strong,{children:`Activity title`}),`.`]}),_jsxs(_components.p,{children:[`In the illustrated version, `,_jsx(_components.strong,{children:`Image URL`}),` receives the base image address. Paste the address and check that the image appears in the workspace.`]}),_jsx(Frame,{caption:`Creation: activity title, image URL and first point.`,children:_jsx(OptimizedImage,{src:`https://mintcdn.com/levante-lab/iSV727FKjPVHmEYK/images/supervisor-hotspot/create-hotspot.png?fit=max\u0026auto=format\u0026n=iSV727FKjPVHmEYK\u0026q=85\u0026s=1b9bf029183e9272695e7e45e28dd54e`,alt:`Hotspot Image form with Activity title, Image URL, base image and Hotspot 1 editing card.`,loading:`lazy`,style:{width:`100%`,maxWidth:`660px`,display:`block`,margin:`0 auto`,borderRadius:`12px`},\"data-og-width\":`560`,width:`560`,\"data-og-height\":`787`,height:`787`,\"data-path\":`images/supervisor-hotspot/create-hotspot.png`,\"data-optimize\":`true`,\"data-opv\":`3`,srcset:`https://mintcdn.com/levante-lab/iSV727FKjPVHmEYK/images/supervisor-hotspot/create-hotspot.png?w=280\u0026fit=max\u0026auto=format\u0026n=iSV727FKjPVHmEYK\u0026q=85\u0026s=5c3e12bc2b64dd9afe22a3fdad14e248 280w, https://mintcdn.com/levante-lab/iSV727FKjPVHmEYK/images/supervisor-hotspot/create-hotspot.png?w=560\u0026fit=max\u0026auto=format\u0026n=iSV727FKjPVHmEYK\u0026q=85\u0026s=846aa7ab0ae98957d98e6b47f163b382 560w, https://mintcdn.com/levante-lab/iSV727FKjPVHmEYK/images/supervisor-hotspot/create-hotspot.png?w=840\u0026fit=max\u0026auto=format\u0026n=iSV727FKjPVHmEYK\u0026q=85\u0026s=ae094f3d95577fc69dea793bd87a9f2c 840w, https://mintcdn.com/levante-lab/iSV727FKjPVHmEYK/images/supervisor-hotspot/create-hotspot.png?w=1100\u0026fit=max\u0026auto=format\u0026n=iSV727FKjPVHmEYK\u0026q=85\u0026s=68c3161f931b7c5f9b29f1f1c82f9bee 1100w, https://mintcdn.com/levante-lab/iSV727FKjPVHmEYK/images/supervisor-hotspot/create-hotspot.png?w=1650\u0026fit=max\u0026auto=format\u0026n=iSV727FKjPVHmEYK\u0026q=85\u0026s=a8db82679181ecb6b68429acebdafe7a 1650w, https://mintcdn.com/levante-lab/iSV727FKjPVHmEYK/images/supervisor-hotspot/create-hotspot.png?w=2500\u0026fit=max\u0026auto=format\u0026n=iSV727FKjPVHmEYK\u0026q=85\u0026s=794fa05e140a884fe7a754c05ac44b27 2500w`})}),_jsx(_components.p,{children:`Choose a clear image and check its framing before positioning points. The base image differs from the media added to each Hot Spot’s content.`})]}),_jsxs(Step,{title:`Click the image to add points`,icon:`crosshairs`,children:[_jsxs(_components.p,{children:[`In `,_jsx(_components.strong,{children:`Click on the image to add hotspots`}),`, click the position you want to associate with information.`]}),_jsxs(_components.p,{children:[`The interface identifies the point and displays its editing card, such as `,_jsx(_components.strong,{children:`Hotspot 1`}),`.`]}),_jsxs(_components.p,{children:[`Use the `,_jsx(_components.strong,{children:`zoom`}),` controls, when available, to position the marker more precisely. Avoid overlapping points or points so close together that they are hard to select.`]}),_jsx(Frame,{caption:`Positioning: image with zoom and Hot Spot card.`,children:_jsx(OptimizedImage,{src:`https://mintcdn.com/levante-lab/iSV727FKjPVHmEYK/images/supervisor-hotspot/map-and-video-form.png?fit=max\u0026auto=format\u0026n=iSV727FKjPVHmEYK\u0026q=85\u0026s=ef86f281c4315b29bf7065645ff0522e`,alt:`Map click area with zoom controls and Hotspot 1 card with title, content and video fields.`,loading:`lazy`,style:{width:`100%`,maxWidth:`420px`,display:`block`,margin:`0 auto`,borderRadius:`12px`},\"data-og-width\":`313`,width:`313`,\"data-og-height\":`733`,height:`733`,\"data-path\":`images/supervisor-hotspot/map-and-video-form.png`,\"data-optimize\":`true`,\"data-opv\":`3`,srcset:`https://mintcdn.com/levante-lab/iSV727FKjPVHmEYK/images/supervisor-hotspot/map-and-video-form.png?w=280\u0026fit=max\u0026auto=format\u0026n=iSV727FKjPVHmEYK\u0026q=85\u0026s=e7b26f2a7d442b0c4ae4a2ec8a631164 280w, https://mintcdn.com/levante-lab/iSV727FKjPVHmEYK/images/supervisor-hotspot/map-and-video-form.png?w=560\u0026fit=max\u0026auto=format\u0026n=iSV727FKjPVHmEYK\u0026q=85\u0026s=0834b8f82ad6b14977a66e8ab68d0250 560w, https://mintcdn.com/levante-lab/iSV727FKjPVHmEYK/images/supervisor-hotspot/map-and-video-form.png?w=840\u0026fit=max\u0026auto=format\u0026n=iSV727FKjPVHmEYK\u0026q=85\u0026s=6a11f878d40ba166e47b0524fd5917f0 840w, https://mintcdn.com/levante-lab/iSV727FKjPVHmEYK/images/supervisor-hotspot/map-and-video-form.png?w=1100\u0026fit=max\u0026auto=format\u0026n=iSV727FKjPVHmEYK\u0026q=85\u0026s=473732e76fff4083cc86d6d73c9c3a17 1100w, https://mintcdn.com/levante-lab/iSV727FKjPVHmEYK/images/supervisor-hotspot/map-and-video-form.png?w=1650\u0026fit=max\u0026auto=format\u0026n=iSV727FKjPVHmEYK\u0026q=85\u0026s=46f98dc704c036ad79a4625db27182e9 1650w, https://mintcdn.com/levante-lab/iSV727FKjPVHmEYK/images/supervisor-hotspot/map-and-video-form.png?w=2500\u0026fit=max\u0026auto=format\u0026n=iSV727FKjPVHmEYK\u0026q=85\u0026s=3da6ae0492161b15b117f187e5b9c007 2500w`})}),_jsx(_components.p,{children:`On a map, the position should match the region explained. On a diagram or object, mark the part to which the content refers.`})]}),_jsxs(Step,{title:`Enter the point title and explanation`,icon:`pen-to-square`,children:[_jsxs(_components.p,{children:[`In `,_jsx(_components.strong,{children:`Hotspot Title`}),` or `,_jsx(_components.strong,{children:`Hotspot title`}),`, enter a name that makes the subject recognisable.`]}),_jsxs(_components.p,{children:[`In `,_jsx(_components.strong,{children:`Hotspot Content`}),`, prepare the information participants will see when they select the point.`]}),_jsx(_components.p,{children:`Keep the explanation related to the marked position. If the aim is to explore a region, present information about that region; if it is to identify part of an object, explain its function.`}),_jsxs(_components.p,{children:[`Some versions mark title and content as `,_jsx(_components.strong,{children:`optional`}),`. Check your installation’s fields and ensure that each point offers an understandable presentation, using resources appropriate for your audience.`]})]}),_jsxs(Step,{title:`Add media by URL when this form is displayed`,icon:`link`,children:[_jsx(_components.p,{children:`The URL version provides two optional areas:`}),_jsxs(Table,{children:[_jsx(_components.thead,{children:_jsxs(_components.tr,{children:[_jsx(_components.th,{children:`Area`}),_jsx(_components.th,{children:`What to configure`})]})}),_jsxs(_components.tbody,{children:[_jsxs(_components.tr,{children:[_jsx(_components.td,{children:_jsx(_components.strong,{children:`Title Media`})}),_jsx(_components.td,{children:`An image or video associated with the title presentation.`})]}),_jsxs(_components.tr,{children:[_jsx(_components.td,{children:_jsx(_components.strong,{children:`Content Media`})}),_jsx(_components.td,{children:`An image or video supplementing the point’s explanation.`})]})]})]}),_jsxs(_components.p,{children:[`Select `,_jsx(_components.strong,{children:`Image`}),` or `,_jsx(_components.strong,{children:`Video`}),` in the desired area and complete the corresponding URL field.`]}),_jsx(Frame,{caption:`Media by URL: title, content and image or video selection.`,children:_jsx(OptimizedImage,{src:`https://mintcdn.com/levante-lab/iSV727FKjPVHmEYK/images/supervisor-hotspot/hotspot-url-media.png?fit=max\u0026auto=format\u0026n=iSV727FKjPVHmEYK\u0026q=85\u0026s=2b70664382fe5870283fcf0987fd1573`,alt:`Hotspot 1 card with Hotspot Title, Title Media, Hotspot Content, Content Media, URL fields and Save Hotspot.`,loading:`lazy`,style:{width:`100%`,maxWidth:`740px`,display:`block`,margin:`0 auto`,borderRadius:`12px`},\"data-og-width\":`787`,width:`787`,\"data-og-height\":`579`,height:`579`,\"data-path\":`images/supervisor-hotspot/hotspot-url-media.png`,\"data-optimize\":`true`,\"data-opv\":`3`,srcset:`https://mintcdn.com/levante-lab/iSV727FKjPVHmEYK/images/supervisor-hotspot/hotspot-url-media.png?w=280\u0026fit=max\u0026auto=format\u0026n=iSV727FKjPVHmEYK\u0026q=85\u0026s=f3847db21ee3121ca1e0d950af400a5d 280w, https://mintcdn.com/levante-lab/iSV727FKjPVHmEYK/images/supervisor-hotspot/hotspot-url-media.png?w=560\u0026fit=max\u0026auto=format\u0026n=iSV727FKjPVHmEYK\u0026q=85\u0026s=e7ba2cfe7f58918019ff58e80d9896f8 560w, https://mintcdn.com/levante-lab/iSV727FKjPVHmEYK/images/supervisor-hotspot/hotspot-url-media.png?w=840\u0026fit=max\u0026auto=format\u0026n=iSV727FKjPVHmEYK\u0026q=85\u0026s=2db6f73e128a02b7d20c8889bbb84a0e 840w, https://mintcdn.com/levante-lab/iSV727FKjPVHmEYK/images/supervisor-hotspot/hotspot-url-media.png?w=1100\u0026fit=max\u0026auto=format\u0026n=iSV727FKjPVHmEYK\u0026q=85\u0026s=cb1c0fc0065b4b9d191d0450b6978112 1100w, https://mintcdn.com/levante-lab/iSV727FKjPVHmEYK/images/supervisor-hotspot/hotspot-url-media.png?w=1650\u0026fit=max\u0026auto=format\u0026n=iSV727FKjPVHmEYK\u0026q=85\u0026s=0668e216afe4e48dcc2b800a24b382c4 1650w, https://mintcdn.com/levante-lab/iSV727FKjPVHmEYK/images/supervisor-hotspot/hotspot-url-media.png?w=2500\u0026fit=max\u0026auto=format\u0026n=iSV727FKjPVHmEYK\u0026q=85\u0026s=972661b83b8198459f43487f81216e73 2500w`})}),_jsxs(_components.p,{children:[`Check that each address loads the expected media. Selecting `,_jsx(_components.strong,{children:`Video`}),` in one area does not mean that the other area has also received a video.`]}),_jsx(_components.p,{children:`You can use a sign language presentation alongside the title and another resource to develop the content, according to the available fields.`})]}),_jsxs(Step,{title:`Upload videos when file fields are available`,icon:`video`,children:[_jsxs(_components.p,{children:[`Another form version provides video fields with thumbnails and a `,_jsx(_components.strong,{children:`+`}),` button instead of URL fields.`]}),_jsxs(_components.p,{children:[`The example shows `,_jsx(_components.strong,{children:`Video Content`}),` and `,_jsx(_components.strong,{children:`Hotspot Content - Video`}),` areas alongside title and text fields.`]}),_jsx(Frame,{caption:`Media by file: point title, text and video fields.`,children:_jsx(OptimizedImage,{src:`https://mintcdn.com/levante-lab/iSV727FKjPVHmEYK/images/supervisor-hotspot/hotspot-video-content.png?fit=max\u0026auto=format\u0026n=iSV727FKjPVHmEYK\u0026q=85\u0026s=aa44f2421e8aadc660d6d326d6e50db6`,alt:`Hotspot 1 card with optional title, Video Content, optional text and Hotspot Content - Video, with a 100 MB limit per video.`,loading:`lazy`,style:{width:`100%`,maxWidth:`460px`,display:`block`,margin:`0 auto`,borderRadius:`12px`},\"data-og-width\":`414`,width:`414`,\"data-og-height\":`817`,height:`817`,\"data-path\":`images/supervisor-hotspot/hotspot-video-content.png`,\"data-optimize\":`true`,\"data-opv\":`3`,srcset:`https://mintcdn.com/levante-lab/iSV727FKjPVHmEYK/images/supervisor-hotspot/hotspot-video-content.png?w=280\u0026fit=max\u0026auto=format\u0026n=iSV727FKjPVHmEYK\u0026q=85\u0026s=5ae4a0ce05a49119b5b5498c90fceb74 280w, https://mintcdn.com/levante-lab/iSV727FKjPVHmEYK/images/supervisor-hotspot/hotspot-video-content.png?w=560\u0026fit=max\u0026auto=format\u0026n=iSV727FKjPVHmEYK\u0026q=85\u0026s=91359fea16e4901621c95e3f136394f3 560w, https://mintcdn.com/levante-lab/iSV727FKjPVHmEYK/images/supervisor-hotspot/hotspot-video-content.png?w=840\u0026fit=max\u0026auto=format\u0026n=iSV727FKjPVHmEYK\u0026q=85\u0026s=b08f31a6b049ddd5973da3d588105607 840w, https://mintcdn.com/levante-lab/iSV727FKjPVHmEYK/images/supervisor-hotspot/hotspot-video-content.png?w=1100\u0026fit=max\u0026auto=format\u0026n=iSV727FKjPVHmEYK\u0026q=85\u0026s=085c24a7b1a34d8f13dcf661afe59b77 1100w, https://mintcdn.com/levante-lab/iSV727FKjPVHmEYK/images/supervisor-hotspot/hotspot-video-content.png?w=1650\u0026fit=max\u0026auto=format\u0026n=iSV727FKjPVHmEYK\u0026q=85\u0026s=a729f4dc505769064ce09676ab395c56 1650w, https://mintcdn.com/levante-lab/iSV727FKjPVHmEYK/images/supervisor-hotspot/hotspot-video-content.png?w=2500\u0026fit=max\u0026auto=format\u0026n=iSV727FKjPVHmEYK\u0026q=85\u0026s=d10e41c1f035027ecb4dd567431cff95 2500w`})}),_jsxs(_components.p,{children:[`Use the corresponding field control and check the preview after adding the file. The example indicates `,_jsx(_components.strong,{children:`100 MB`}),`; always check the limit shown in your installation.`]}),_jsx(_components.p,{children:`Prepare videos in the appropriate sign language for your audience and check that each one matches its field’s purpose.`}),_jsxs(_components.p,{children:[`The screens show `,_jsx(_components.strong,{children:`form variations`}),`. Follow the controls available in your installation to add media.`]})]}),_jsxs(Step,{title:`Save the point and check the full set`,icon:`check`,children:[_jsxs(_components.p,{children:[`In the URL form, use `,_jsx(_components.strong,{children:`Save Hotspot`}),` to confirm the point. In versions with other controls, finish editing according to the displayed interface.`]}),_jsx(_components.p,{children:`Repeat for other locations of interest. Check the relationship between each position, its title and associated content.`}),_jsx(_components.p,{children:`The cards include a deletion control. After removing a point, review those remaining. If you change the base image, check all Hot Spot positions again.`}),_jsxs(_components.p,{children:[_jsx(_components.strong,{children:`Saving a Hot Spot is one step in creation.`}),` Before finishing the activity, check all markers, text and media, then complete setup using the controls in your installation.`]})]})]}),`\n`,_jsx(Heading,{level:`2`,id:`check-how-content-is-presented`,children:`Check how content is presented`}),`\n`,_jsx(_components.p,{children:`The supplied screens show two ways of displaying a point’s content. Check which is used in your installation and review the participant experience.`}),`\n`,_jsx(Heading,{level:`3`,id:`content-in-a-window-over-the-image`,children:`Content in a window over the image`}),`\n`,_jsxs(_components.p,{children:[`Selecting a point can display content in an `,_jsx(_components.strong,{children:`overlay window`}),`, with media and text. `,_jsx(_components.strong,{children:`X`}),` closes the window and returns to the image.`]}),`\n`,_jsx(OptimizedImage,{src:`https://mintcdn.com/levante-lab/iSV727FKjPVHmEYK/images/image-65.png?fit=max\u0026auto=format\u0026n=iSV727FKjPVHmEYK\u0026q=85\u0026s=602885bac1ff1591e118a9a674ff10e8`,alt:`Hot Spot content in an overlay window`,\"data-og-width\":`1366`,width:`1366`,\"data-og-height\":`1245`,height:`1245`,\"data-path\":`images/image-65.png`,\"data-optimize\":`true`,\"data-opv\":`3`,srcset:`https://mintcdn.com/levante-lab/iSV727FKjPVHmEYK/images/image-65.png?w=280\u0026fit=max\u0026auto=format\u0026n=iSV727FKjPVHmEYK\u0026q=85\u0026s=7037469eeade1dca4d11ca5565f6546e 280w, https://mintcdn.com/levante-lab/iSV727FKjPVHmEYK/images/image-65.png?w=560\u0026fit=max\u0026auto=format\u0026n=iSV727FKjPVHmEYK\u0026q=85\u0026s=215b60d1cff95a480c918094aebfa9ab 560w, https://mintcdn.com/levante-lab/iSV727FKjPVHmEYK/images/image-65.png?w=840\u0026fit=max\u0026auto=format\u0026n=iSV727FKjPVHmEYK\u0026q=85\u0026s=c3552bb576141c33cb9180327131b1dc 840w, https://mintcdn.com/levante-lab/iSV727FKjPVHmEYK/images/image-65.png?w=1100\u0026fit=max\u0026auto=format\u0026n=iSV727FKjPVHmEYK\u0026q=85\u0026s=2f3fc350ce374174aaadc9a4d240e32b 1100w, https://mintcdn.com/levante-lab/iSV727FKjPVHmEYK/images/image-65.png?w=1650\u0026fit=max\u0026auto=format\u0026n=iSV727FKjPVHmEYK\u0026q=85\u0026s=b9b0123c52d906a88a3bb3ad397c86d0 1650w, https://mintcdn.com/levante-lab/iSV727FKjPVHmEYK/images/image-65.png?w=2500\u0026fit=max\u0026auto=format\u0026n=iSV727FKjPVHmEYK\u0026q=85\u0026s=1621a34e2e20818d0e08046b18a48f6e 2500w`}),`\n`,_jsx(Frame,{caption:`Exploration: point content in an overlay window.`,children:_jsx(`div`,{style:{position:`relative`,aspectRatio:`425 / 750`,width:`100%`,maxWidth:`500px`,margin:`0 auto`,overflow:`hidden`,borderRadius:`12px`},children:_jsx(OptimizedImage,{src:`https://mintcdn.com/levante-lab/iSV727FKjPVHmEYK/images/supervisor-hotspot/participant-popup.png?fit=max\u0026auto=format\u0026n=iSV727FKjPVHmEYK\u0026q=85\u0026s=e989f7a13f502da70ebefa36361d7e53`,alt:`Hot Spot window with video, title, text, another media item and a close button over the map.`,loading:`lazy`,style:{position:`absolute`,width:`321.41176%`,maxWidth:`none`,height:`auto`,left:`-110.58824%`,top:`-33.33333%`,margin:0},\"data-og-width\":`1366`,width:`1366`,\"data-og-height\":`1245`,height:`1245`,\"data-path\":`images/supervisor-hotspot/participant-popup.png`,\"data-optimize\":`true`,\"data-opv\":`3`,srcset:`https://mintcdn.com/levante-lab/iSV727FKjPVHmEYK/images/supervisor-hotspot/participant-popup.png?w=280\u0026fit=max\u0026auto=format\u0026n=iSV727FKjPVHmEYK\u0026q=85\u0026s=14bd4dd81db521a3766b6f2f6bfeb593 280w, https://mintcdn.com/levante-lab/iSV727FKjPVHmEYK/images/supervisor-hotspot/participant-popup.png?w=560\u0026fit=max\u0026auto=format\u0026n=iSV727FKjPVHmEYK\u0026q=85\u0026s=30df77e8fc4812872681f889b74816e4 560w, https://mintcdn.com/levante-lab/iSV727FKjPVHmEYK/images/supervisor-hotspot/participant-popup.png?w=840\u0026fit=max\u0026auto=format\u0026n=iSV727FKjPVHmEYK\u0026q=85\u0026s=3145db5a939dcd7dc157151a21f7e411 840w, https://mintcdn.com/levante-lab/iSV727FKjPVHmEYK/images/supervisor-hotspot/participant-popup.png?w=1100\u0026fit=max\u0026auto=format\u0026n=iSV727FKjPVHmEYK\u0026q=85\u0026s=3e8d024f74e602acf550aae465cfaf78 1100w, https://mintcdn.com/levante-lab/iSV727FKjPVHmEYK/images/supervisor-hotspot/participant-popup.png?w=1650\u0026fit=max\u0026auto=format\u0026n=iSV727FKjPVHmEYK\u0026q=85\u0026s=a022f5126d97cdb3736dc14c93242cdd 1650w, https://mintcdn.com/levante-lab/iSV727FKjPVHmEYK/images/supervisor-hotspot/participant-popup.png?w=2500\u0026fit=max\u0026auto=format\u0026n=iSV727FKjPVHmEYK\u0026q=85\u0026s=d31d3757a67b98fe6df40043a015e79b 2500w`})})}),`\n`,_jsx(_components.p,{children:`Check that the title is recognisable, text is readable and videos play. Replace the Lorem ipsum example text with the activity information.`}),`\n`,_jsx(Heading,{level:`3`,id:`content-below-the-image`,children:`Content below the image`}),`\n`,_jsxs(_components.p,{children:[`Another screen shows `,_jsx(_components.strong,{children:`View content`}),` below the map. The example presents `,_jsx(_components.strong,{children:`South America`}),`, sign language media, text and a related image.`]}),`\n`,_jsx(OptimizedImage,{src:`https://mintcdn.com/levante-lab/iSV727FKjPVHmEYK/images/image-66.png?fit=max\u0026auto=format\u0026n=iSV727FKjPVHmEYK\u0026q=85\u0026s=2614f2282a01650d484f3d78a705598a`,alt:`Selected Hot Spot content below the image`,\"data-og-width\":`1366`,width:`1366`,\"data-og-height\":`1925`,height:`1925`,\"data-path\":`images/image-66.png`,\"data-optimize\":`true`,\"data-opv\":`3`,srcset:`https://mintcdn.com/levante-lab/iSV727FKjPVHmEYK/images/image-66.png?w=280\u0026fit=max\u0026auto=format\u0026n=iSV727FKjPVHmEYK\u0026q=85\u0026s=0ea96e9482370c4323eac4b284d8409d 280w, https://mintcdn.com/levante-lab/iSV727FKjPVHmEYK/images/image-66.png?w=560\u0026fit=max\u0026auto=format\u0026n=iSV727FKjPVHmEYK\u0026q=85\u0026s=d2724293f28ddb27cf728c915d430732 560w, https://mintcdn.com/levante-lab/iSV727FKjPVHmEYK/images/image-66.png?w=840\u0026fit=max\u0026auto=format\u0026n=iSV727FKjPVHmEYK\u0026q=85\u0026s=767bd7823aafc167764fbb16fcaac70f 840w, https://mintcdn.com/levante-lab/iSV727FKjPVHmEYK/images/image-66.png?w=1100\u0026fit=max\u0026auto=format\u0026n=iSV727FKjPVHmEYK\u0026q=85\u0026s=179338bb4973c9666895b7c1d1817c9f 1100w, https://mintcdn.com/levante-lab/iSV727FKjPVHmEYK/images/image-66.png?w=1650\u0026fit=max\u0026auto=format\u0026n=iSV727FKjPVHmEYK\u0026q=85\u0026s=da2cd6ef675057648aca1e6fa202de78 1650w, https://mintcdn.com/levante-lab/iSV727FKjPVHmEYK/images/image-66.png?w=2500\u0026fit=max\u0026auto=format\u0026n=iSV727FKjPVHmEYK\u0026q=85\u0026s=0afc56a77f5d6a1afcdaaaa3dfd8a0a9 2500w`}),`\n`,_jsx(Frame,{caption:`Exploration: selected content displayed below the base image.`,children:_jsx(`div`,{style:{position:`relative`,aspectRatio:`720 / 825`,width:`100%`,maxWidth:`680px`,margin:`0 auto`,overflow:`hidden`,borderRadius:`12px`},children:_jsx(OptimizedImage,{src:`https://mintcdn.com/levante-lab/iSV727FKjPVHmEYK/images/supervisor-hotspot/participant-inline-content.png?fit=max\u0026auto=format\u0026n=iSV727FKjPVHmEYK\u0026q=85\u0026s=9367746c6ac6a13be79d29958b6c3a53`,alt:`View content section with South America title, sign language media, text and an image of South America.`,loading:`lazy`,style:{position:`absolute`,width:`189.72222%`,maxWidth:`none`,height:`auto`,left:`-38.19444%`,top:`-124.84848%`,margin:0},\"data-og-width\":`1366`,width:`1366`,\"data-og-height\":`1925`,height:`1925`,\"data-path\":`images/supervisor-hotspot/participant-inline-content.png`,\"data-optimize\":`true`,\"data-opv\":`3`,srcset:`https://mintcdn.com/levante-lab/iSV727FKjPVHmEYK/images/supervisor-hotspot/participant-inline-content.png?w=280\u0026fit=max\u0026auto=format\u0026n=iSV727FKjPVHmEYK\u0026q=85\u0026s=2fa2ceb3f3d1dac5f47848ef332a5e13 280w, https://mintcdn.com/levante-lab/iSV727FKjPVHmEYK/images/supervisor-hotspot/participant-inline-content.png?w=560\u0026fit=max\u0026auto=format\u0026n=iSV727FKjPVHmEYK\u0026q=85\u0026s=2787c461c48e84ad1e19a9e1caac6934 560w, https://mintcdn.com/levante-lab/iSV727FKjPVHmEYK/images/supervisor-hotspot/participant-inline-content.png?w=840\u0026fit=max\u0026auto=format\u0026n=iSV727FKjPVHmEYK\u0026q=85\u0026s=7fe76745895ba12804e5817b93ef5052 840w, https://mintcdn.com/levante-lab/iSV727FKjPVHmEYK/images/supervisor-hotspot/participant-inline-content.png?w=1100\u0026fit=max\u0026auto=format\u0026n=iSV727FKjPVHmEYK\u0026q=85\u0026s=a078bec54905ef9aebbb901175175dd6 1100w, https://mintcdn.com/levante-lab/iSV727FKjPVHmEYK/images/supervisor-hotspot/participant-inline-content.png?w=1650\u0026fit=max\u0026auto=format\u0026n=iSV727FKjPVHmEYK\u0026q=85\u0026s=a4e000de0117989b030cf130dddda5c0 1650w, https://mintcdn.com/levante-lab/iSV727FKjPVHmEYK/images/supervisor-hotspot/participant-inline-content.png?w=2500\u0026fit=max\u0026auto=format\u0026n=iSV727FKjPVHmEYK\u0026q=85\u0026s=f59e9df21f83d4da79f27cab8dfd5496 2500w`})})}),`\n`,_jsxs(_components.p,{children:[`Participants select numbered points to explore information. Also check `,_jsx(_components.strong,{children:`Topics`}),` and the zoom controls according to their availability in the interface.`]}),`\n`,_jsx(_components.p,{children:`The screenshots do not demonstrate grading or automatic-completion rules based on click counts. When guiding the class, describe what to explore and check how activity monitoring is presented in your installation.`}),`\n`,_jsx(Heading,{level:`2`,id:`review-before-finishing`,children:`Review before finishing`}),`\n`,_jsx(_components.p,{children:`Before making the activity available:`}),`\n`,_jsxs(_components.ul,{children:[`\n`,_jsx(_components.li,{children:`Check the Space, type, title and instructions.`}),`\n`,_jsx(_components.li,{children:`Check that the base image loads correctly.`}),`\n`,_jsx(_components.li,{children:`Check the position and selection of each point.`}),`\n`,_jsx(_components.li,{children:`Review titles and explanations.`}),`\n`,_jsx(_components.li,{children:`Test URLs and media added.`}),`\n`,_jsx(_components.li,{children:`Play videos and check the sign language used.`}),`\n`,_jsx(_components.li,{children:`Check readability and the relationship between image, text and video.`}),`\n`,_jsx(_components.li,{children:`Open points in the participant presentation and check the content shown.`}),`\n`,_jsx(_components.li,{children:`Review the full set after deleting points or replacing the base image.`}),`\n`]}),`\n`,_jsx(_components.p,{children:`Complete activity setup using the available controls and check the presentation of the full set.`}),`\n`,_jsx(Card,{title:`Consult the activity overview`,icon:`clipboard-check`,href:`/en/visual-classroom/supervisor/assessment`,children:_jsx(_components.p,{children:`Relate the activity format to the learning objective and participation options.`})}),`\n`,_jsx(Heading,{level:`2`,id:`support-visuolab’s-continued-development`,children:`Support VisuoLab’s continued development`}),`\n`,_jsxs(Note,{children:[_jsx(_components.p,{children:_jsx(_components.strong,{children:`The continuity of Levante Lab’s technical team is at risk without sustained funding.`})}),_jsx(_components.p,{children:`Support helps maintain VisuoLab and SignBank, improve accessibility, and sustain development and user assistance in collaboration with research partners and Deaf communities.`}),_jsx(_components.p,{children:_jsx(_components.a,{href:`/en/support/visuolab`,children:`Explore funding needs and ways to contribute →`})})]}),`\n`,_jsx(Heading,{level:`2`,id:`continue-browsing`,children:`Continue browsing`}),`\n`,_jsxs(CardGroup,{cols:2,children:[_jsx(Card,{title:`Previous`,icon:`arrow-left`,href:`/en/visual-classroom/supervisor/assessment/interactive-video`,children:_jsx(_components.p,{children:_jsx(_components.strong,{children:`Create interactive video activities`})})}),_jsx(Card,{title:`Next`,icon:`arrow-right`,href:`/en/visual-classroom/supervisor/scales`,children:_jsx(_components.p,{children:_jsx(_components.strong,{children:`Configure assessment scales`})})})]})]})}function MDXContent(props={}){const{wrapper:MDXLayout}={..._provideComponents(),...props.components};return MDXLayout?_jsx(MDXLayout,{...props,children:_jsx(_createMdxContent,{...props})}):_createMdxContent(props)}return{default:MDXContent};function _missingMdxReference(id,component){throw new Error(`Expected `+(component?`component`:`object`)+\" `\"+id+\"` to be defined: you likely forgot to import, pass, or provide it.\")}","frontmatter":{},"scope":{"config":{},"pageMetadata":{"title":"Create Hot Spot activities","sidebarTitle":"Hot Spot","description":"Choose the base image, position interactive points and associate titles, text, images and videos with exploration content.","icon":"location-dot","hideFooterPagination":true,"href":"/en/visual-classroom/supervisor/assessment/hotspot"}}},"mdxSourceWithNoJs":null},"mdxExtracts":{"tableOfContents":[{"title":"Plan the image and content","slug":"plan-the-image-and-content","depth":2,"children":[]},{"title":"Create the activity","slug":"create-the-activity","depth":2,"children":[]},{"title":"Check how content is presented","slug":"check-how-content-is-presented","depth":2,"children":[{"title":"Content in a window over the image","slug":"content-in-a-window-over-the-image","depth":3,"children":[]},{"title":"Content below the image","slug":"content-below-the-image","depth":3,"children":[]}]},{"title":"Review before finishing","slug":"review-before-finishing","depth":2,"children":[]},{"title":"Support VisuoLab’s continued development","slug":"support-visuolab’s-continued-development","depth":2,"children":[]},{"title":"Continue browsing","slug":"continue-browsing","depth":2,"children":[]}],"codeExamples":{}},"jsLinks":[],"subdomain":"levante-lab","siteName":"VisuoLab Docs","title":"Create Hot Spot activities - VisuoLab Docs","navMaps":{"firstHrefInVersion":{},"firstHrefInLanguage":{}},"lastModified":"2026-11-06T21:24:26.049Z","originalFileLocation":"en/visual-classroom/supervisor/assessment/hotspot.mdx"},"headHtml":"\u003cscript data-mint-head>(function(){var d=document.documentElement,p=\"light\";if(!p){try{p=localStorage.getItem(\"isDarkMode\")}catch(e){}if(p==='true')p='dark';else if(p==='false')p='light';if(p!=='light'\u0026\u0026p!=='dark'\u0026\u0026p!=='system')p=\"light\"}var r=p==='system'?(matchMedia(\"(prefers-color-scheme: dark)\").matches?'dark':'light'):p;d.classList.remove(r==='dark'?'light':'dark');d.classList.add(r);d.setAttribute(\"data-theme-preference\",p)})();\u003c/script>\u003cmeta data-mint-head name=\"description\" content=\"Choose the base image, position interactive points and associate titles, text, images and videos with exploration content.\">\u003cmeta data-mint-head name=\"application-name\" content=\"VisuoLab Docs\">\u003cmeta data-mint-head name=\"generator\" content=\"Mintlify\">\u003clink data-mint-head rel=\"apple-touch-icon\" type=\"image/png\" sizes=\"180x180\" href=\"https://visuolab.levantelab.com.br/_nuxt/img/logo-azul-mobile.0de2042.png\">\u003clink data-mint-head rel=\"icon\" type=\"image/png\" sizes=\"32x32\" href=\"https://visuolab.levantelab.com.br/_nuxt/img/logo-azul-mobile.0de2042.png\">\u003clink data-mint-head rel=\"icon\" type=\"image/png\" sizes=\"16x16\" href=\"https://visuolab.levantelab.com.br/_nuxt/img/logo-azul-mobile.0de2042.png\">\u003clink data-mint-head rel=\"shortcut icon\" type=\"image/png\" href=\"https://visuolab.levantelab.com.br/_nuxt/img/logo-azul-mobile.0de2042.png\">\u003cmeta data-mint-head property=\"og:title\" content=\"Create Hot Spot activities - VisuoLab Docs\">\u003cmeta data-mint-head property=\"og:description\" content=\"Choose the base image, position interactive points and associate titles, text, images and videos with exploration content.\">\u003cmeta data-mint-head property=\"og:site_name\" content=\"VisuoLab Docs\">\u003cmeta data-mint-head property=\"og:url\" content=\"https://docs-visuolab.levantelab.com.br/en/visual-classroom/supervisor/assessment/hotspot\">\u003cmeta data-mint-head property=\"og:type\" content=\"website\">\u003cmeta data-mint-head property=\"og:image\" content=\"https://levante-lab.mintlify.site/_mintlify/api/og/v2?division=Create+assessment+activities\u0026amp;title=Create+Hot+Spot+activities\u0026amp;description=Choose+the+base+image%2C+position+interactive+points+and+associate+titles%2C+text%2C+images+and+videos+with+exploration+content.\u0026amp;theme=d9ad4d36f65ecb582bbed332\u0026amp;signature=34509e0fc2a02d42b150d72fafc45d3ba495ff27cab40ec6043d1063530dad8d\">\u003cmeta data-mint-head property=\"og:image:width\" content=\"1200\">\u003cmeta data-mint-head property=\"og:image:height\" content=\"630\">\u003cmeta data-mint-head name=\"twitter:card\" content=\"summary_large_image\">\u003cmeta data-mint-head name=\"twitter:title\" content=\"Create Hot Spot activities - VisuoLab Docs\">\u003cmeta data-mint-head name=\"twitter:description\" content=\"Choose the base image, position interactive points and associate titles, text, images and videos with exploration content.\">\u003cmeta data-mint-head name=\"twitter:image\" content=\"https://levante-lab.mintlify.site/_mintlify/api/og/v2?division=Create+assessment+activities\u0026amp;title=Create+Hot+Spot+activities\u0026amp;description=Choose+the+base+image%2C+position+interactive+points+and+associate+titles%2C+text%2C+images+and+videos+with+exploration+content.\u0026amp;theme=d9ad4d36f65ecb582bbed332\u0026amp;signature=34509e0fc2a02d42b150d72fafc45d3ba495ff27cab40ec6043d1063530dad8d\">\u003cmeta data-mint-head name=\"twitter:image:width\" content=\"1200\">\u003cmeta data-mint-head name=\"twitter:image:height\" content=\"630\">\u003cmeta data-mint-head name=\"msapplication-config\" content=\"https://mintlify.s3.us-west-1.amazonaws.com/levante-lab/_generated/favicon/browserconfig.xml?v=3\">\u003cmeta data-mint-head name=\"apple-mobile-web-app-title\" content=\"VisuoLab Docs\">\u003cmeta data-mint-head name=\"msapplication-TileColor\" content=\"#004CBA\">\u003clink data-mint-head rel=\"canonical\" href=\"https://docs-visuolab.levantelab.com.br/en/visual-classroom/supervisor/assessment/hotspot\">\u003clink data-mint-head rel=\"alternate\" type=\"application/xml\" href=\"/sitemap.xml\">\u003clink data-mint-head rel=\"alternate\" type=\"text/markdown\" href=\"/en/visual-classroom/supervisor/assessment/hotspot.md\">\u003cscript data-mint-head type=\"application/ld+json\">{\"@context\":\"https://schema.org\",\"@graph\":[{\"@type\":\"Organization\",\"@id\":\"https://docs-visuolab.levantelab.com.br/#organization\",\"name\":\"VisuoLab Docs\",\"url\":\"https://docs-visuolab.levantelab.com.br\",\"logo\":{\"@type\":\"ImageObject\",\"url\":\"https://mintcdn.com/levante-lab/sHq77Ab4_9RhsSFq/images/logo-geral-horizontal-azul.png?fit=max\u0026auto=format\u0026n=sHq77Ab4_9RhsSFq\u0026q=85\u0026s=ad4fa21f31ba75ed8e2d17d1b2fbe57d\"}},{\"@type\":\"WebSite\",\"@id\":\"https://docs-visuolab.levantelab.com.br#website\",\"name\":\"VisuoLab Docs\",\"url\":\"https://docs-visuolab.levantelab.com.br\",\"publisher\":{\"@id\":\"https://docs-visuolab.levantelab.com.br/#organization\"}},{\"@type\":\"WebPage\",\"@id\":\"https://docs-visuolab.levantelab.com.br/en/visual-classroom/supervisor/assessment/hotspot#webpage\",\"url\":\"https://docs-visuolab.levantelab.com.br/en/visual-classroom/supervisor/assessment/hotspot\",\"name\":\"Create Hot Spot activities\",\"description\":\"Choose the base image, position interactive points and associate titles, text, images and videos with exploration content.\",\"dateModified\":\"2026-11-06T21:24:26.049Z\",\"isPartOf\":{\"@id\":\"https://docs-visuolab.levantelab.com.br#website\"},\"breadcrumb\":{\"@id\":\"https://docs-visuolab.levantelab.com.br/en/visual-classroom/supervisor/assessment/hotspot#breadcrumb\"}},{\"@type\":\"BreadcrumbList\",\"@id\":\"https://docs-visuolab.levantelab.com.br/en/visual-classroom/supervisor/assessment/hotspot#breadcrumb\",\"itemListElement\":[{\"@type\":\"ListItem\",\"position\":1,\"name\":\"Use VisuoLab\",\"item\":\"https://docs-visuolab.levantelab.com.br/en/portal\"},{\"@type\":\"ListItem\",\"position\":2,\"name\":\"Multifunctional Room\",\"item\":\"https://docs-visuolab.levantelab.com.br/en/visual-classroom\"},{\"@type\":\"ListItem\",\"position\":3,\"name\":\"For supervisors\",\"item\":\"https://docs-visuolab.levantelab.com.br/en/teaching\"},{\"@type\":\"ListItem\",\"position\":4,\"name\":\"Create assessment activities\",\"item\":\"https://docs-visuolab.levantelab.com.br/en/visual-classroom/supervisor/assessment\"},{\"@type\":\"ListItem\",\"position\":5,\"name\":\"Create Hot Spot activities\",\"item\":\"https://docs-visuolab.levantelab.com.br/en/visual-classroom/supervisor/assessment/hotspot\"}]},{\"@type\":[\"Article\",\"TechArticle\"],\"@id\":\"https://docs-visuolab.levantelab.com.br/en/visual-classroom/supervisor/assessment/hotspot#article\",\"headline\":\"Create Hot Spot activities\",\"name\":\"Create Hot Spot activities\",\"description\":\"Choose the base image, position interactive points and associate titles, text, images and videos with exploration content.\",\"url\":\"https://docs-visuolab.levantelab.com.br/en/visual-classroom/supervisor/assessment/hotspot\",\"mainEntityOfPage\":{\"@id\":\"https://docs-visuolab.levantelab.com.br/en/visual-classroom/supervisor/assessment/hotspot#webpage\"},\"dateModified\":\"2026-11-06T21:24:26.049Z\",\"publisher\":{\"@id\":\"https://docs-visuolab.levantelab.com.br/#organization\"},\"isPartOf\":{\"@id\":\"https://docs-visuolab.levantelab.com.br#website\"}}]}\u003c/script>\u003cscript data-mint-head type=\"application/ld+json\">{\"@context\":\"https://schema.org\",\"@type\":\"WebSite\",\"name\":\"VisuoLab Docs\",\"publisher\":{\"@type\":\"Organization\",\"name\":\"VisuoLab Docs\"},\"provider\":{\"@type\":\"Organization\",\"name\":\"Mintlify\",\"url\":\"https://mintlify.com\"}}\u003c/script>","agentPointerHref":"/en/visual-classroom/supervisor/assessment/hotspot.md","siteName":"VisuoLab Docs","nav":{"global":null,"tabs":[{"tab":"English","icon":"https://flagcdn.com/gb.svg","pages":[{"group":"Getting started","pages":[{"title":"Welcome to VisuoLab","sidebarTitle":"Welcome to VisuoLab","href":"/en/welcome"},{"title":"First steps","sidebarTitle":"First steps","href":"/en/first-steps"}]},{"group":"Use VisuoLab","pages":[{"group":"Portal and My Resources","icon":"book-open","pages":[{"title":"Discover the Portal","sidebarTitle":"Discover the Portal","href":"/en/portal"},{"title":"Search and explore materials","href":"/en/portal/search"},{"title":"Open, save and share","href":"/en/portal/interact"},{"title":"Organize My Resources","href":"/en/portal/my-resources"}]},{"group":"Resource Creator","icon":"pen-to-square","pages":[{"title":"Start creating","sidebarTitle":"Start creating","icon":"pen-to-square","href":"/en/resource-creator"},{"title":"Create a V-Book","sidebarTitle":"Create a V-Book","icon":"book-open","href":"/en/resource-creator/v-book"}]},{"group":"Multifunctional Room","icon":"chalkboard-user","pages":[{"title":"Explore the Multifunctional Room","sidebarTitle":"Explore the Multifunctional Room","icon":"chalkboard-user","href":"/en/visual-classroom"},{"title":"Access your spaces","sidebarTitle":"Access your spaces","icon":"door-open","href":"/en/visual-classroom/access"},{"group":"For participants","icon":"user","pages":[{"group":"Take part in freeform activities","icon":"comments","pages":[{"title":"Explore the five types","sidebarTitle":"Explore freeform activities","icon":"comments","href":"/en/visual-classroom/participant/free-activities"},{"title":"Freeform activity: Comments only","sidebarTitle":"Comments only","icon":"comments","href":"/en/visual-classroom/participant/comments-only"},{"title":"Freeform activity: Submission","sidebarTitle":"Submission","icon":"video","href":"/en/visual-classroom/participant/submission"},{"title":"Freeform activity: Simultaneous","sidebarTitle":"Simultaneous","icon":"desktop","href":"/en/visual-classroom/participant/simultaneous"},{"title":"Freeform activity: Video meeting","sidebarTitle":"Video meeting","icon":"video","href":"/en/visual-classroom/participant/video-meeting"},{"title":"Freeform activity: Consecutive","sidebarTitle":"Consecutive","icon":"language","href":"/en/visual-classroom/participant/consecutive"}]},{"group":"Assessment activities","icon":"clipboard-check","pages":[{"title":"Explore assessment activities","sidebarTitle":"Explore assessment activities","icon":"clipboard-check","href":"/en/visual-classroom/participant/assessment"},{"title":"Assessment activity: Reception","sidebarTitle":"Reception","icon":"list-check","href":"/en/visual-classroom/participant/assessment/reception"},{"title":"Assessment activity: Production","sidebarTitle":"Production","icon":"video","href":"/en/visual-classroom/participant/assessment/production"},{"title":"Assessment activity: Interaction","sidebarTitle":"Interaction","icon":"users","href":"/en/visual-classroom/participant/assessment/interaction"},{"title":"Assessment activity: Random generation","sidebarTitle":"Random generation","icon":"shuffle","href":"/en/visual-classroom/participant/assessment/random"}]},{"title":"View results and feedback","sidebarTitle":"View results and feedback","icon":"chart-simple","href":"/en/visual-classroom/participant/results"}]},{"group":"For supervisors","icon":"chalkboard-user","pages":[{"title":"Teaching with VisuoLab","sidebarTitle":"Teaching with VisuoLab","icon":"lightbulb","href":"/en/teaching"},{"title":"Create and organize a space","sidebarTitle":"Create and organize a space","icon":"chalkboard-user","href":"/en/visual-classroom/supervisor/spaces"},{"title":"Create freeform activities","sidebarTitle":"Create freeform activities","icon":"comments","href":"/en/visual-classroom/supervisor/free-activities"},{"group":"Create assessment activities","icon":"clipboard-check","pages":[{"title":"Create assessment activities","sidebarTitle":"Overview","icon":"clipboard-check","href":"/en/visual-classroom/supervisor/assessment"},{"title":"Create multiple choice activities","sidebarTitle":"Multiple choice","icon":"list-check","href":"/en/visual-classroom/supervisor/assessment/multiple-choice"},{"title":"Create true or false activities","sidebarTitle":"True or false","icon":"check-double","href":"/en/visual-classroom/supervisor/assessment/true-false"},{"title":"Create short answer activities","sidebarTitle":"Short answer","icon":"align-left","href":"/en/visual-classroom/supervisor/assessment/short-answer"},{"title":"Create matrix activities","sidebarTitle":"Matrix","icon":"table-cells","href":"/en/visual-classroom/supervisor/assessment/matrix"},{"title":"Create drag and drop activities","sidebarTitle":"Drag and drop","icon":"arrows-up-down-left-right","href":"/en/visual-classroom/supervisor/assessment/drag-and-drop"},{"title":"Create interactive video activities","sidebarTitle":"Interactive video","description":"Prepare the base video, add stop markers and configure interactive questions, including blanks for dragging text.","icon":"film","href":"/en/visual-classroom/supervisor/assessment/interactive-video"},{"title":"Create Hot Spot activities","sidebarTitle":"Hot Spot","icon":"location-dot","href":"/en/visual-classroom/supervisor/assessment/hotspot"}]},{"title":"Configure assessment scales","sidebarTitle":"Configure assessment scales","description":"Create assessment scales, define performance ranges and explain levels in sign language.","icon":"ruler","href":"/en/visual-classroom/supervisor/scales"},{"title":"Assess and support participants","sidebarTitle":"Assess and support participants","icon":"chart-simple","href":"/en/visual-classroom/supervisor/evaluation"}]}]}]},{"group":"Institution and technology","pages":[{"group":"Institutional administration","icon":"building-columns","pages":[{"title":"Discover administration","sidebarTitle":"Discover administration","href":"/en/administration"},{"group":"Daily management","icon":"list-check","pages":[{"title":"Explore daily management","sidebarTitle":"Overview","icon":"list-check","href":"/en/administration/daily-management"},{"title":"Users and permissions","sidebarTitle":"Users and permissions","icon":"users","href":"/en/administration/daily-management/users"},{"title":"Resources and forms","sidebarTitle":"Resources and forms","icon":"folder-open","href":"/en/administration/daily-management/resources"},{"title":"Reporting","sidebarTitle":"Reporting","icon":"flag","href":"/en/administration/daily-management/reporting"},{"title":"Spaces and activities","sidebarTitle":"Spaces and activities","icon":"chalkboard-user","href":"/en/administration/daily-management/spaces"},{"title":"Institutional content and settings","sidebarTitle":"Institutional content and settings","icon":"sliders","href":"/en/administration/daily-management/settings"}]},{"group":"Languages and translations","icon":"language","pages":[{"title":"Understand the multilingual platform","href":"/en/administration/multilingual"},{"title":"Configure languages","href":"/en/administration/languages"},{"title":"Review interface texts","href":"/en/administration/frontend"},{"title":"Translate forms and institutional content","href":"/en/administration/object-texts"},{"title":"Add sign language videos","href":"/en/administration/sign-language"},{"title":"Check translations on the platform","href":"/en/administration/review"}]}]},{"title":"Installation and technical configuration","sidebarTitle":"Installation and configuration","href":"/en/installation"},{"title":"Integrations and API","sidebarTitle":"Integrations and API","icon":"plug","href":"/en/integrations-api"}]},{"group":"Support the ecosystem","icon":"hand-heart","pages":[{"title":"Support VisuoLab","href":"/en/support/visuolab"},{"title":"Contribute to VisuoLab","href":"/en/support/sustainability"},{"title":"Fund the evolution of VisuoLab","href":"/en/support/roadmap"},{"title":"Sponsor an installation","href":"/en/support/installations"}]},{"title":"Support monthly","sidebarTitle":"Support monthly","icon":"hand-holding-heart","url":"https://ko-fi.com/visuolablevantelab/tiers","iconType":"solid","href":"/en/support/monthly-support"},{"title":"Install at your institution","sidebarTitle":"Install at your institution","icon":"building","url":"https://visuolab.levantelab.com.br/en/landing-page/visuolab#contact","iconType":"solid","href":"/en/support/institutional-installation"}]},{"tab":"Português","icon":"https://flagcdn.com/br.svg","pages":[{"title":"Português","href":"/pt-BR/welcome"}]},{"tab":"Deutsch","icon":"https://flagcdn.com/de.svg","pages":[{"title":"Deutsch","href":"/de/welcome"}]},{"tab":"Eesti","icon":"https://flagcdn.com/ee.svg","pages":[{"title":"Eesti","href":"/et/welcome"}]},{"tab":"Magyar","icon":"https://flagcdn.com/hu.svg","pages":[{"title":"Magyar","href":"/hu/welcome"}]}]},"basePath":"","title":"Create Hot Spot activities - VisuoLab Docs","buildId":"dpl_Fyv1NbzwP68g2bEH2Roy98uY1zmE","deploymentId":"dpl_Fyv1NbzwP68g2bEH2Roy98uY1zmE","dynamics":["a74be98ba7","07c022d89b"],"chunks":["zoom-image-lightbox-BbK2OBGL.js","lightbox-handle-r17bVUz3.js","Frame-D2acuaLg.js","DynamicMarkdown-Co5nikxh.js"]}

 English
 Português
 Deutsch
 Eesti
 Magyar